- mechanical
- ergonomic
- travel
- keyboard
Firmware Upload
Once you have a .hex file, you'll want to get it loaded onto the controller of your Atreus keyboard. (If you don't have a .hex file yet, see the downloads for the standard layouts or the QMK configurator to build your own custom layout.) You'll need to install an uploader program. avrdude is a command-line tool for doing this on unix-based systems; Windows users may prefer the avrdudess GUI.
Install on Debian/Ubuntu
Simply run $ sudo apt install avrdude
Install on macOS
If you have Homebrew:
$ brew tap osx-cross/avr
$ brew install avrdude
If you don't have Homebrew, use Crosspack for AVR.
Uploading with avrdude
You'll need to find the path your OS uses for the USB device. On most Linux-based systems it's /dev/ttyACM0 while on Macs it's usually something like /dev/cu.usbmodem1421.
The device will only accept new firmware when in bootloader mode. See the Reset section below for how to enter the bootloader. Once you've done that, run one of these commands, replacing atreus.hex with the filename of the .hex file you've downloaded:
$ sudo avrdude -p atmega32u4 -c avr109 -U flash:w:atreus.hex -P /dev/ttyACM0 # linux
$ avrdude -p atmega32u4 -c avr109 -U flash:w:atreus.hex -P /dev/cu.usbmodem1421 # mac
Determining USB path
If you get a No such file or directory error from the command above, you can determine the correct USB path with these commands:
$ ls /dev > /tmp/dev-off # run this while the device is unplugged
$ ls /dev > /tmp/dev-on # run this while the device is in bootloader mode
$ diff /tmp/dev-off /tmp/dev-on # this will show the device path
Once you have the device path, use it as the last argument in the avrdude command listed above.
Windows
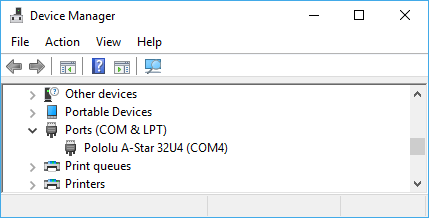
Start by installing the A-Star drivers, as documented by Pololu.
You will need to determine the correct port setting by resetting the controller and looking at the "Ports (COM & LPT)" section of the Windows Device Manager; it should show up as "Pololu A-Star Micro 32U4" if you check within 8 seconds of initiating a reset.
Then install avrdudess and run it.
- pick "avr109" as the programmer
- select "ATmega32u4" from the MCU section in the upper left
- select the port in the upper left as found in the device manager
- choose the .hex file you downloaded
- reset the microcontroller so that the LED is gently pulsing
- press "go" under "flash"
Reset
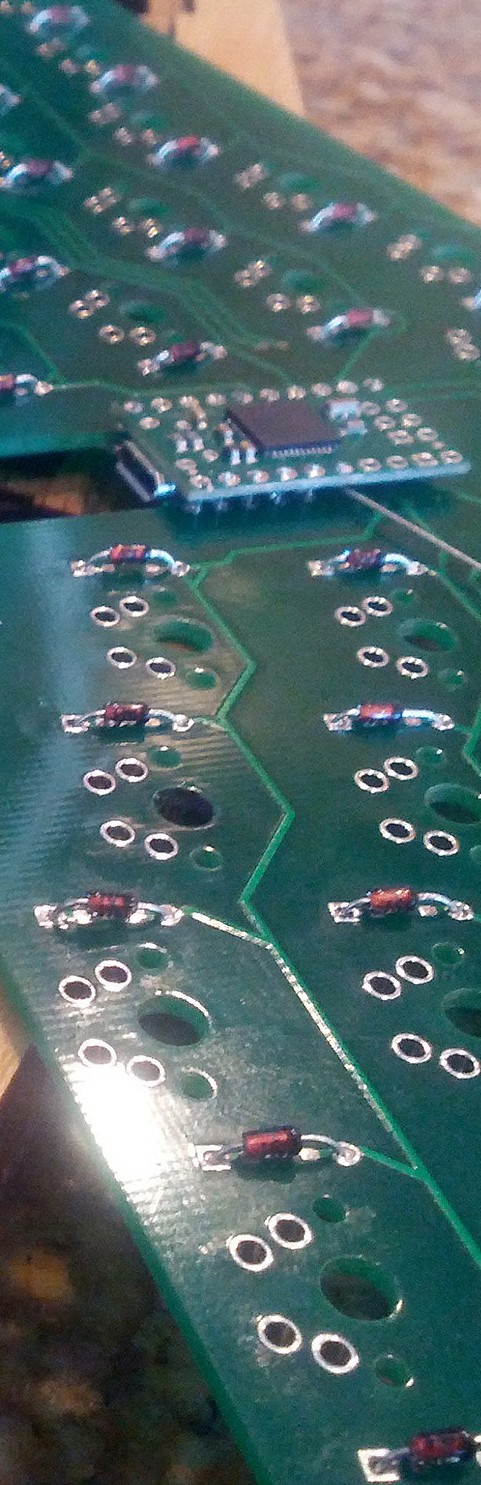
If this is your first time uploading and you built your own, you will have to hard reset by connecting the RESET pin to GND twice in under a second to jump to the bootloader. (This requires removing the back panel.) They are the pin the second from the bottom and fifth from the bottom on the left-side row of microcontroller pins. This diagram identifies them.
While the device is in bootloader mode, the LED will pulse gently on and off. If you idle in the bootloader for 8 seconds without uploading, the controller will exit the bootloader and return to normal operation; you'll have to redo the sequence to get back to the bootloader.
If you've already got the firmware loaded on the controller, you should have a key bound to reset; typically this is activated by jumping to layer 2 (fn+ESC) and then hitting B.